Friday, September 30

#17 bunkers day 2 and 3

The traps on 17 have been shaped and sodded, and all that remains is to edge, compact the floors, and add sand. It's been a whirlwind few days with the maintenance staff working sun-up to sun-down to get the project finished on time.

The rain has not been very cooperative, but despite that, we were able to finish most of the sod work before the big rain came.  This is important to protect the newly formed banks from eroding.  Unfortunately, the rain did prevent us from finishing the work on the trap floors, which must be completed before we can think about putting sand in.  Still not all bad for 3 days work.

Everybody wants to know when they will open.  We will have the area play as ground under repair for the next little while, but hopefully you will get to enjoy (or curse) the new traps before the golf season is over.  We have opened up the hole to play, but please DO NOT walk on the new sod and especially the steep faces.  Below are a few more pics from the weeks work.


Here, Simon is delicately forming the face of the bunker.

After the shaping is finished, we dug the drainage trenches with the backhoe.  Difficult with all the rock in the subgrade.

The trench is shot with a transit and lined with gravel.  Here the crew is installing the double-walled drain tile.

While we button up the right trap, Simon starts building the left trap.

Another shot of Simon putting some finishing touches on the right trap.

The drain line was trenched and tied in to our existing drain line.

Drain tile being covered with pea gravel.

All of the bunker faces were finished by hand-tamping.  The crew has a lot of sore shoulders this week.

Finishing the sod over the new drain line.

Meanwhile, the left trap excavation continues.

The pile in the center is the infant pile of bedrock that would end up being almost 10 feet tall.

And finally, the first piece of sod hits the ground.

Crew getting tired.  Aaron wants to go home.  No dice.

Simon had to literally chisel the last bit of bedrock out of the trap.  It made a cloud of dust while he was pounding away.

Sod work continues.

To move the last of the waste material, we worked well into the night and in the rain.
Day three had its own obstacles.  Our old steel pipe irrigation system reared its ugly head while digging the trench for the drains.  A few minutes of delay and an acetylene torch later, and we were back in business.

Drainage trench on the left side trap.

Face is tamped smooth and gravel going in the drain line.


With the severity of the slope, the sod work was difficult.

At one point we even needed a ladder to install the sod staples.

Thursday, September 29

A fresh face for #17

I apologize for not having pics and updates for the last few days, especially given that we have started one of the biggest projects since I came here 7 years ago.  As many of you know, we have begun renovations on the bunkers for #17.  The left trap had become unmaintainable and unplayable, so with the support of the committee, I hired a professional golf construction company and retained the advice of Shawn Smith (from Arthur Hills and Assoc) and we started digging Tuesday.

Normally, when a course renovates bunkers, you would hire a golf construction company to do all of the work, with a little support from the maintenance staff.  This is the best way to get fast results and not let the golf course conditions suffer at the expense of a big project.  To save money, the maintenance staff is doing ALLof the grunt work, while a professional shaper does the heavy lifting.  The shaper is the key to moving the dirt efficiently while our crew handles the finish, drainage, and sod work.  This has been an enormous undertaking, with the crew working sun-up to sun-down, while also performing their normal, early morning maintenance on the rest of the course.

Obviously, if we are serious about future bunker improvements, using our maintenance crew is not a viable option for large-scale renovations.  My hope is that through completing this small portion, the membership can see the value of professional work as well as the value of our current master plan.  I will speak further about this once the project is complete.  For now, see some pics from Tuesday.  The Wednesday pictures are a little more dramatic, but the damn things wont upload!  I will hopefully get them out soon.

Scraping out the old sand.

This is Simon.  He is from Texas and with Eagle Golf Construction.  He is an absolute Wizard with the controls.  I have worked with many golf shapers in the past, and he is world class.

Getting the sand out of the larger trap.

We use plywood to save as much turf as possible.  Little difficult in the rain, however.

With the sand coming out, it's time to start moving dirt.


Taking down the left edge.

And finally, some bedrock.  We hit a lot of this throughout the project.

Starting to take shape.


More bedrock.

Wednesday, September 21

Let me level with you...

As we all know, #15 tee has been one of the worst playing surfaces on the entire golf course.  Over the years, the right side has settled fairly dramatically, and a nice 'crown' has developed in the center of the tee making the middle 5 feet the only acceptable teeing ground on the entire tee.  I have wanted to do something about it for years, but only now have we had the full time to commit to this project.

If we had all the money in the world, my first option would have been to have a professional shaper laser-grade the top  to perfection and re-build the entire tee as outlined in the master plan.  Unfortunately, when you only have time and money to do a tee or two at a time, hiring professionals is seldom economically prudent what with fuel cost and mobilization.  So, for now, your maintenance staff is doing what it can to level the tee surface, widen the tee a bit, and hopefully make the entire tee surface usable for our players.  This repair will serve us well until the timing is right to do some more serious renovations.  We are not professional shapers nor do we have professional equipment, but we do have enough experience and 'good eyes' on the crew to "do it up old school" and eventually get a good result.  Given the condition of the tee, there's no way we could make it worse.  We have done the best we can with what we have to work with.

The tee had deteriorated to the point where the right edge was almost 10 inches lower than the middle of the tee!  I was shocked at the difference when we brought out the transit and shot the grade.  To bring that up high enough, we were forced to widen the tee also to provide enough support material to make a change in grade of that magnitude.  Ultimately, it will allow us to have a tee wide enough to use the entire thing.

In just a couple of days, we have managed to strip the tee sod, push out the crown, and add about 60 yards of fresh dirt to the tee.  We layed the salvaged sod today, and will finish with sod from our nursery tomorrow.  With good weather and rooting, we should be able to play on it before the year is over.

Check out the pics below.

With a rainy start to the week, we thought the project might get scrapped.  We were able to start building up new edge and moving material to support the new width of the tee.

We shot and set some rough stakes and just started piling and packing.

Machines and a lot of elbow grease from the crew shaped in the new edge.

The rain let up, so we decided to start stripping sod.  Heavy divot areas just fell apart, but we did manage to save about 60% of the existing tee sod.

You can really see how focused the divot wear is in the middle of the tee as a result of the uneven surface.

Sod was stripped and palletized and moved with our skid loader.

The crown in the middle of the tee was the result of years and years of filling divots.  There was about 2-3 inches of green sand even once we got to the proper level!

Once the grades were shot, we placed some stakes and started adding dirt to the left side.  Between 6 and 9 inches of material was added to this edge to level the tee.


Looking at the black tape on the stake, it's easy to see how low the middle and edge of the tee was, and this was after we had already rough-graded it.

Once we got it all smoothed out, we broadcast a thick layer of sand/compost mix and drug it with a steel mat to get all the little bumps and birdbaths out.

In just two days we have managed to start laying sod again.  We will hopefully button things up tomorrow.

Friday, September 16

Frost delays explained - with terrible production value

We had our first frost this morning, which is a little early for us.  It reminded me of this terrible little movie that my friends at PACE turf put together.  While cheesy, poorly written, poorly acted, and a little too reminiscent of Rose City Motors commercials, the points are good.

Tuesday, September 13

A perfect example of what I've been blabbing about

Unbeknownst to you, or even me to a certain extent, I've had a case study in progress in the pot bunker on #17.  All season, in response to questions about the conditions of the bunkers and the sand, I've spoken about 'contamination' and 'runoff' and 'sand faces' and 'lack of drainage'. Right now, there is a perfect example of what I've been talking about that makes it easy to illustrate.

Each of the last two seasons, we have dug out #17 pot bunker, reshaped, and added fresh sand in an effort to make it somewhat playable.  Balls entering the trap have a tendency to roll all the way to the back, and we did this to minimize it.  The important point is that we have added brand-spanking new sand to this bunker this season, and most of you are familiar with what it looks like now-back to hard, contaminated, and mostly muddy.

The take-home message here is that the quality and consistency of the bunker sand is always directly proportional to the quality of the construction and drainage.  As far as construction is concerned, this bunker was "perched" up like a pimple as opposed to "dug out" like a crater.  Once traffic, maintenance, and constant sand splashing about added up, the edges began to erode.  With the buildup of sand, the edges were constantly trimmed back, exposing more and more soil on the face of the trap.  Now, with only a few good rains over the course of 1 season, you can plainly see in the pictures below that the sand is completely contaminated.     As far as drainage is concerned, there is none.  The trap will only drain as fast as the clay and soil beneath allow.  This makes for standing water that carries contaminants from below the sand as well.  All-in-all it's a losing battle.  If this trap is to get better, it needs to be rebuilt, not unlike many traps on the course.  Many members seem to think just continually adding sand will make all the traps just splendid.  Adding sand does help most bunkers for a limited time, but it is easy to see in this situation that's not the case. 

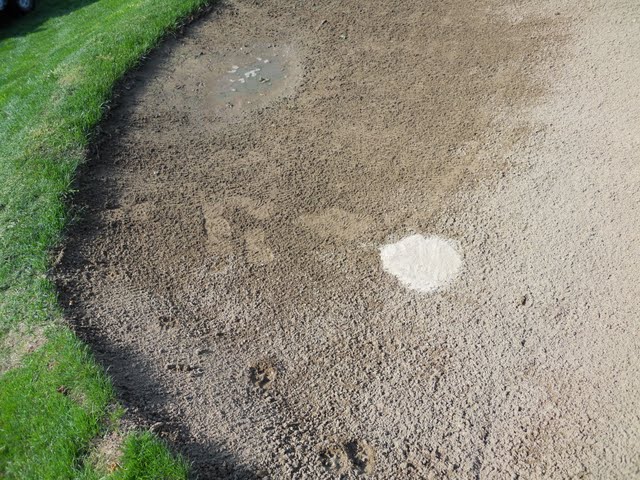
Below, check out the pictures.  You can see plainly (look at the bright patch of sand) what the sand looked like when it was put in around June 1st and what it looks like now after only one season.

The brightly colored spot is what the sand looked like fresh.  The bottom of the photo shows the color of wet sand, and above the bright spot is dry sand in the trap.  The color difference is dramatic wet or dry.  The new sand I used was actually dug out of #8 greenside trap on the same day at the same time.  So it has even spent a season in play-not brand new sand!

I made sure to put the fresh sand in between the wet spot in the trap.  You can see how much brighter it is than the dry and wet sand.  The consistency is also more soil-like than sandy.  This only took 1 season with the poor condition of the trap.
We hope to rebuild the traps on 17 this fall weather permitting.  With the help of our master plan architects and a professional shaper, we will work to create an attractive and more playable hazard that will make a great par-3 even better. 

Tuesday, September 6

I'm wearing a jacket at 2 in the afternoon! Must be time to aerify something!

As a lovely afternoon chill blankets the golf course, I start to get the itch to punch some holes!  Normally, we would be considering aerifying the greens about now, but since we moved green and fairway aerification to October, we will get started with the tees.  Today, we were able to get 12 sets of tees aerified and hopefully finish them off in the next couple of days.  If the predicted poor weather comes, bear with us as we cannot punch tees in the rain.  We will try to finish them no later than next week. 
If you played today and wondered what the little 'grooves' in the fairways are, we have also started 'verti-cutting' fairways.  Using a row of vertically oriented blades that look similar to an asterisk, we are lightly thinning the canopy and standing the grass blades up. This activity also severs 'stolons' (aka lateral growth stems) to stimulate 'creeping' to help fill in weak areas.  Also, verti-cutting serves to lightly 'de-thatch' the fairways by removing excess dead grass tissue and other organic matter in the upper profile.  This will hopefully make for a healthier canopy as the plants start to throw down roots.  Also, it should provide a better canopy to allow our upcoming granular fertilizer applications to get down into the soil and less susceptible to mower pickup.

Now that the stresses of a difficult summer are behind us, we are just starting to do the things that will make us healthier for next season.  I will keep you up to date as we go through our steps.  As a side note, Greens aerification will be Monday, October 3rd.

CLICK ON THE 'PLAY' BUTTON BELOW TO SEE THE AERIFIER IN ACTION ON 17 TEE


We are using 3/4" tines at 2x2 spacing.  Lots of nice, clean holes.  This creates an opportunity for gas exchange, nice channels for new fall roots, and better drainage.
The vertical mower that chops up the aerification plugs.


After we chop them up with the vertical mower, not much but thatch and 'fuzz' left over.

Then we drag with a heavy brush to get the last of it broken up.


Andy blowing off the 'fuzz'

The final result.  A few holes not filled, but no big deal on tees.

A closeup of the fairway verti-cutter unit attached to our normal fairway mower.


Very subtle.  The right side of the picture is the 'grooves' from the verticutting.  The left side has yet to be cut.  We will do a much more aggressive de-thatching later this month.